ASSEMBLY
INSTRUCTIONS FOR YOUR
"Update
Kit for Walthers HO Track Cleaning Car"
BACKGROUND FACTS
ABOUT YOUR "Update Walthers
Kit"
This kit will improve the performance of your
Walthers HO Track Cleaning Car. The contacts will make your car have (8) eight
electrical contact points using all the wheel sets.
This kit contains all the necessary parts, which can be
modified to fit into all other types of cars too. The kit is for HO
scale in model railroading. Obviously, this is not a stand-alone kit. Once
you decide to install this kit into your cars, please follow the instructions in
READ THIS FIRST for the steps needed for installation.
IMPORTANT
-- READ THIS FIRST:
1. Before beginning to dissemble your Track Cleaning
Car, read all the instructions and tips through once and familiarize yourself
with all the parts and their proper location by comparing them to the drawings.
All parts are numbered to corresponding picture on the cover page 2.
STEPS
FOR INSTALLATION:
Picture No.

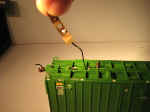
- Remove
the Top of your Walthes HO Track Cleaning Car. Caution is need not to break
the inside tabs! Lift at one end of the car slowly to disengage the tabs.
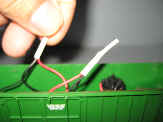
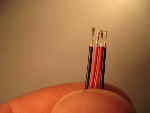
- Gently
pull-off the shrink tubing from each set of wires. Unwrap the wires from the
each set of trucks (solid black). Important, keep the sets of motor leads
(one red & black paired together, 2 pairs)
- Flip
the car over and set it on its top.
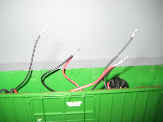
- Remove
the Bolster Screw from each set of trucks. (Both sides) SAVE THE SCREWS!
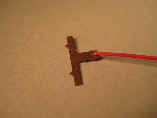
- Remove
the Contacts w/wire leads from each side off the posts gently. Pulling the
wire thru the holes.
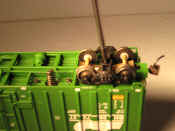
- CAREFULLY
remove all wheel sets from each truck (4-wheel sets)
- Strip
the NEW wire leads about 1/8” at one end. Solder the wire leads into the
hole one the contacts at the bottom end of the “T” (Single hole) USE
min. amount of solder for each wire lead.
- Remount
each truck and place one “NEW” wheel set at each end of the trucks. DO
NOT over tighten the bolster screws.
- Install
the “NEW” contact and wire lead on each side of the Truck. IMPORTANT:
Keep the RED & Black on same side for BOTH trucks. SEE PICTURE
(NOTE: one Red & Black for EACH truck)
- When
installing the contacts into the trucks slightly bow the contact and set the
wire at a 90°. Also, carefully place the contact point into the truck. Keep
the wire on the outside of the truck.
- Carefully
Place the remaining wheel
sets into each set of truck. Not to over bend the contacts or damage the
plastic truck.
- All
the wheel set should be in the trucks and now Flip the car over and Strip
the remaining “NEW” wire leads (4) about ¼” max.
- Twist
the each pair of Red & Black TRUCKS wires together and keep the
BLACK-to-BLACK & RED to RED as a pair.
- THEN
Twist the BLACK pair(trucks) to one Set of motor Leads, and the RED pair
(trucks) to the other Set of motor lead.
- Reinstall
the shrink tubing or use NEW wire protection (not provided)
- TEST
the car using DC voltage. 12 V max. Use about 6 volts.
- Reinstall
the Hood for the Car.
- YOUR
Car is ready!!
FOR DCC
SEE DCC Manufacturers wire diagrams.
(BASIC RED & BLACK from
the Decoder to the Track, Orange & Grey from the Decoder to each pair of the
Motor Leads)
"Update Kit for Walthers HO Track Cleaning Car"
Pictures for added Help
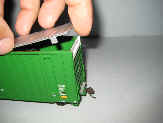
No.1
No.2
Motor Leads Pair
No.4
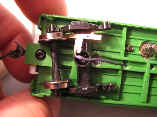
No.5
No.7
No.9
No.10
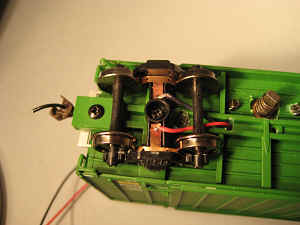
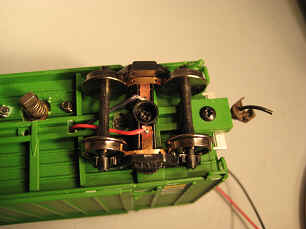
Note: Each Red and Black wire for each set of trucks. KEEP the RED and BLACK
on the same side for at each END of car. This will keep the correct polarity for
the wires.
 MNP QR Code